Tale of Tailwind
I joined the tailwind hype train and couldn't have been happier with the choice.
At Xealth, we recently adopted Tailwind CSS as the primary way to implement our software designs. For those who don't know what Tailwind is, you can find out more here.
I currently lead the Tools team at Xealth. Here's a TLDR of what we do: We build cool stuff to help our employees and customers be more productive.
In tandem with adopting Tailwind, we also adopted Next.js as the framework for building new tools.
We wanted to (finally) give our users the ability to toggle between light and dark mode. This article will walk you through how we tackled this seemingly simple idea and will hopefully get your creative juices flowing!
React Server Components
We'll be using Next.js as the framework example, but these concepts generally apply to any React Server Component app, like Gatsby's Partial Hydration.
React Server Components introduce a new mental model for thinking about how to build React apps. If you want an excellent guide on RSCs, check out this article.
Adding Tailwind dark to a purely client side React app is pretty straightforward. You simply create a Vite app, follow this, and follow Tailwind's Dark Mode guide.
However, adding Tailwind to a React Server Component app is a bit more tricky.
But why?
The Problem
If you want to take advantage of Tailwind's Dark Mode feature, you have two options:
- You can use the
prefers-color-schemeCSS media query- This changes the color scheme based on the user's OS settings
- You can toggle dark mode manually with the
classstrategy- This changes the color scheme based on the user's preference
In many cases, you'll want the user to be able to toggle between light and dark mode; That's where the class strategy comes in handy.
This issue is that the class strategy requires dynamic CSS.
Dynamic CSS in React
Dynamic css isn't a problem for client-side apps because the JSX is rendered on the client, and the CSS is also applied on the client.
What's an example of dynamic css? Let's take clsx for example:
import clsx from 'clsx';

export default function App () {
  const shouldBeBigText = true;
  const className = clsx('text-white', {
    'text-lg': shouldBeBigText,
  });

  return (
    <div className={className}>
      Hello World
    </div>
  );
}
clsx is a tiny utility for constructing className strings conditionally.If you wanted to create a simple toggle button that toggles between light and dark mode, you'd do something like this:
import clsx from 'clsx';

export default function App () {
  const [isDarkMode, setIsDarkMode] = useState(false);
  const className = clsx({
    'dark': isDarkMode,
  });

  return (
    <div className={className}>
    {/** ☝️ add dark to the root of the app */}
      <button onClick={() => setIsDarkMode(!isDarkMode)}>
        Toggle Dark Mode
      </button>
    </div>
  );
}
Now, imagine what would happen if you tried to do this in a React Server Component Framework (like Next).
The flow would look something like this:
1. HTTP Request to the Next server
2. Next server renders the component
3. User presses the toggle button
4. The color of the app changes
This is fine, right?

When the user refreshes the page, the apps's theme will revert back to the default color. What the heck!
The Tailwind Flash
Ok, what if you stored the user's preference in the React state or localStorage API?
That code might look something like this:
import clsx from 'clsx';

export default function App () {
  const [isDarkMode, setIsDarkMode] = useState(false);
  const className = clsx({
    'dark': isDarkMode,
  });

  useEffect(() => {
    const isDarkMode = localStorage.getItem('isDarkMode');
    setIsDarkMode(isDarkMode);
  }, []);

  return (
    <div className={className}>
    {/** ☝️ add dark to the root of the app */}
      <button onClick={() => setIsDarkMode(!isDarkMode)}>
        Toggle Dark Mode
      </button>
    </div>
  );
}
The app flow, however, would look something like this:
1. HTTP Request to the Next server
2. Next server renders the component
3. User presses the toggle button and the preference is saved
4. The color of the app changes
5. User refreshes the page
6. FLASH! The color of the app starts off light and then changes to dark
The flash happens because the default (light mode) CSS is rendered on the server, and the user's preference is stored on the client. That preference is applied once the client renders the component.
This "flash" is often referred to as the FOUC (Flash of Unstyled Content).
In Nextjs 12, users had to resort to (disputable) hacks like this.
Popular packages like next-themes also haven't been updated to support Next 13 (as of writing this article).

So, what's the solution?
The Secret Sauce
Let's backtrack and approach the problem from a thousand foot view.
Understanding the Request flow
RSCs are rendered on the server and then hydrated on the client. This concept means that the HTML (and by default the CSS) is rendered on the server. It isn't obvious to think about at first. The CSS is still rendered on the client, but if you have any dynamic CSS in an RSC, the resulting CSS is a product of the server rendering the component.
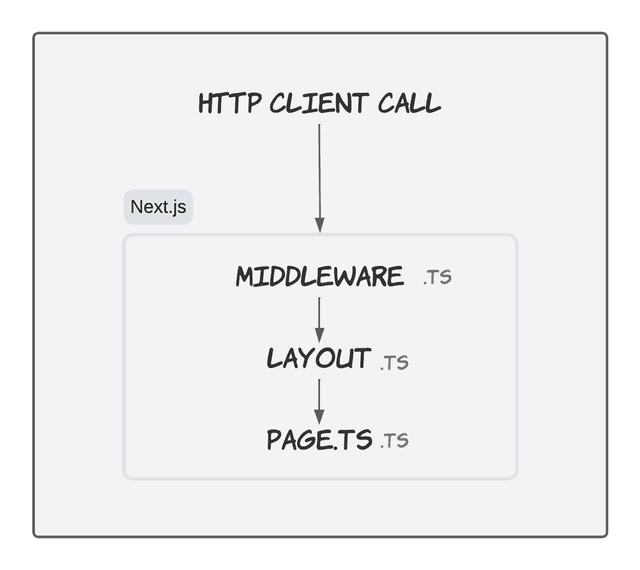
For Nextjs specifically, refer to the diagram above. We must ensure that the CSS is rendered on the server with the correct class at the Layout level.
This configuration allows for Tailwind to be rendered on initial hydration with the correct class (namely, the dark class) and be applied globally.
Enter Cookies 🍪
The solution is to employ a user preference state that is preserved on the client and sent on every request.
Cookies are right up this alley. The user's preference is stored in a cookie, and the server reads this cookie when running layout.ts. The server can now render the component with the correct CSS.
Let's walk through an example of how we implemented this at Xealth.
Step 1: Configure Tailwind to use the class strategy
// tailwind.config.js
module.exports = {
  darkMode: 'class',
  // ...
}Step 2: Create a client component
We'll create a component that toggles between light and dark mode. This component will set a client-side cookie, and then refresh the page.
// ThemeSelector.tsx
'use client'
import Cookies from 'js-cookie'
import { useRouter } from 'next/navigation'
const ThemeSelector = ({ theme }: { theme: 'light' | 'dark' }) => {
  const router = useRouter()
  return (
    <div>
      <button
        onClick={() => {
          Cookies.set('x-theme', theme === 'dark' ? 'light' : 'dark')
          router.refresh()
        }}
        aria-label="switch theme"
        className="rounded bg-indigo-600 px-2 py-1 text-xs font-semibold
         text-white shadow-sm hover:bg-indigo-500 focus-visible:outline
         focus-visible:outline-2 focus-visible:outline-offset-2
         focus-visible:outline-indigo-600"
      >
     { theme === 'dark' ? 'Light Mode' : 'Dark Mode' }
      </button>
    </div>
  )
}
export default ThemeSelector
In this code we're using the popular js-cookie package to set the cookie.
We're also using Next's useRouter hook to refresh the page.
Calling router.refresh() will refresh the page is a key component here, because it will send the cookie on the next request.
Step 3: Use Cookies in the root Layout.ts component
// Layout.tsx
import clsx from 'clsx'
import { cookies } from 'next/headers'
import SomeHeader from './components/Header'
import './globals.css'
export const metadata = {
  title: 'Some App',
  description: 'Never gonna give you up, never gonna let you down',
}
export default async function RootLayout({ children }: { children: React.ReactNode }) {
  const prefersDark = cookies().get('x-theme')?.value === 'dark'
  return (
    <html lang="en">
      <body className={clsx("your main classes here", prefersDark ? 'dark' : undefined)}>
        {/** ☝️ add dark to the root of the app based on the cookie*/}
        <SomeHeader />
        {children}
      </body>
    </html>
  )
}
Step 4: If Nextjs, Make the Theme Select Component Dynamic
If you're using Nextjs and want to import this ThemeSelector.tsx component in a RSC, you'll need to make the client component dynamic.
We'll need this because Nextjs by default renders components (even client components) as Static by default.
Setting the component to dynamic also allows you to avoid making the Layout.tsx component a client component (if your Header component is a server component, for example).
//SomeHeader.tsx
import dynamic from 'next/dynamic'
import { cookies } from 'next/headers'
const ThemeSelector = dynamic(() => import('./ThemeSelector'), {
  ssr: false,
})
const Header = ({ user }: { user?: z.infer<typeof userSchema> }) => {
  const theme = cookies().get('x-theme')?.value
  return (
    <nav className="border-b border-gray-200 bg-white shadow-md dark:border-gray-700 dark:bg-gray-800">
      <ThemeSelector theme={theme === 'dark' ? 'dark' : 'light'} />
    </nav>
  )
}
export default Header
Step 5: Your eyes Profit 💸
And that's it! You should now have a working dark mode toggle that persists on refresh. It'll even persist if the user closes the browser and opens it again.
Important Nextjs Caveat❗
According to the Nextjs docs,
Good to know:
cookies()is a Dynamic Function whose returned values cannot be known ahead of time. Using it in a layout or page will opt a route into dynamic rendering at request time. (source)
This caveat means that putting cookies() in the Layout.tsx component will disable static rendering for the entire app.
You may not want to do this if you have a large app with many static pages.
Workarounds
You can get around this by creating a RSC component hook that can be used on demand.
Imagine you have the following file structure:
- app
  - layout.tsx # 👈 don't put cookies here
  - some-static-page/
    - page.tsx
  - some-dynamic-page/
    - page.tsx
    - layout.tsx # 👈 put cookies here
You can create a layout hook that can be used in the page.tsx component like this:
//RSCThemeProvider.tsx
import clsx from 'clsx'
import { cookies } from 'next/headers'
import SomeHeader from './components/Header'
import './globals.css'
export const metadata = {
  title: 'Some App',
  description: 'Never gonna give you up, never gonna let you down',
}
export default function RSCThemeProvider({ children }: { children: React.ReactNode }) {
  const prefersDark = cookies().get('x-theme')?.value === 'dark'
  return (
    <div className={clsx("your main classes here", prefersDark ? 'dark' : undefined)}>
      {children}
    </div>
  )
}
You can then utilize Nesting Layouts by placing this hook in the page.tsx file:
import RSCThemeProvider from '../components/RSCThemeProvider'

export default function SomeNestedLayout({
  children,
}: {
  children: React.ReactNode
}) {
  return (<RSCThemeProvider>{children}</RSCThemeProvider>)
}
This approach will allow you to use the cookies() function a Layout.tsx page without disabling static rendering for the entire app.
For Dark Mode on static pages, you can try employing Tailwind's official recommendation and combine that with Next's beforeInteractive strategy.
Additional Resources
This concept can be applied (generally) to any React Server Component framework that follows the same request flow as Nextjs. Gatsby's Partial Hydration has a similar model. At the time of writing this, one would need to figure out how to obtain the request's cookies on the Gatsby server side.
If you need a live example, you can also find the source code used on my GitHub by searching ThemeSelector.tsx and Layout.tsx.
This article should give you some ideas on utilizing Next 13's powerful extensibility in building cool features like Dark Mode! More importantly, I hope your eyes thank you.