At Xealth, I was tasked with building an application that monitors real-time status data from Argo Workflows as these workflows provisions test patients in a simulated environment. Rather than polling the API, we leveraged Server Sent Events to receive real-time updates. I was surprised that there weren't many examples of implementing SSE!
I needed to share what I learned after building this feature again with ActivityStreak.
This article is about how to add Server Sent Events to your app so that you can leverage "real-time" updates via the standard EventSource API.
I was heavily inspired by This Article, this Nextjs Issue, and
node-ssestream.
Option 1: You can check out my small lib called ts-sse
If you're looking to quickly add Server Sent Events to your app, I've created a little package called ts-sse.
For in-depth details on how to use it, please see the README.
Installing the package isn't necessary; You can copy the code from the source!
Option 2: You can build it yourself!
Note: This article uses Nextjs, but you can use this approach with any Node/Bun/Edge compatible server.
Step 1: Determine your runtime environment 🤔
Code is hard, but choosing the right Javascript implementation is harder. Knowing your runtime environment is arguably the most critical step! Why? Just take a look below 😅
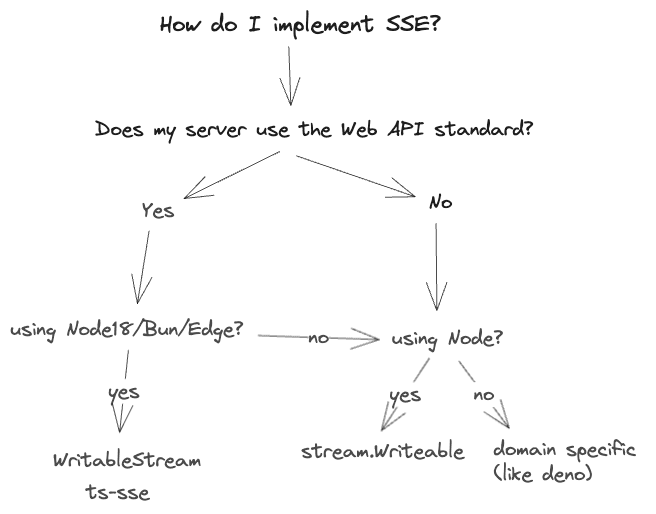
Let's assume you're using Node and Nextjs, for instance. The new Nextjs App Dir utilizes the standard Web APIs Request and Response. Because these APIs aren't the classic Node Request/Response APIs, the implementation of Server-Sent Events is quite different.
To sum up:
-
If your route handler accepts the Web API Standard Request and Response, you'll likely want to use the Nodejs Web Streams API (now available in
nodejs>=18). Think Nextjs, Bun. -
If your route handler accepts the classic Node Node Request/Response APIs, I recommend tailoring your code similar to
node-ssestream. Nestjs's implementation also uses this approach. Think classic Express, Fastify, etc.
Step 2: Understanding the Server-Sent Events Protocol 📜
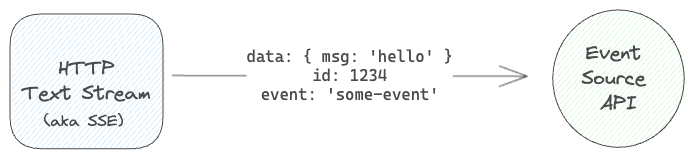
Even though SSE seems complex at first, it's as simple as the diagram above. The Server-Sent Events protocol is a protocol that allows the server to send events to the client. The client can listen to these events via the EventSource API.
This article focuses on the server-side implementation of this protocol. I highly suggest reading the main SSE HTML Spec to understand the protocol's nuances.
Overall, you need to know that the EventSource API expects an HTTP stream of structured UTF-8 encoded text data.
The data you send to the client typically looks like this:
- Basic Message:
data: Hello, world!- Multiple Events:
data: This is the first message.

data: {"message": "some JSON"}- Named Events:
event: user-login
data: {"username": "john_doe", "time": "10:15 AM"}

event: user-logout
data: {"username": "john_doe", "time": "10:45 AM"}- Setting an ID for an Event and Retry:
id: 12345
data: This message has an ID.
retry: 5000
That's it! It's just a stream of text. As the client EventSource receives this text stream and data, it parses the data and emits the appropriate events for you.
Step 3: Create an SSE Writer 📝
Now that you understand the protocol, you can create a text writer that emits the correct data.
Note: Most of the remaining steps should have parity with the classic Node Stream API as long as you're calling
writeable.writeorresponse.writewith the correct data.
In ts-sse, I have the following code that writes a string to a stream:
writeMessage(
  writer: WritableStreamDefaultWriter,
  encoder: TextEncoder,
  message: Message
): void {
  if (message.comment) {
    void writer.write(encoder.encode(`: ${message.comment}\n`))
  }
  if (message.event) {
    void writer.write(encoder.encode(`event: ${message.event}\n`))
  }
  if (message.id) {
    void writer.write(encoder.encode(`id: ${message.id}\n`))
  }
  if (message.retry) {
    void writer.write(encoder.encode(`retry: ${message.retry}\n`))
  }
  if (message.data) {
    void writer.write(encoder.encode(toDataString(message.data)))
  }
}You can make this a standalone function or part of a class. Don't worry about the encoder and writer for now. You mainly need to understand that we write to the stream with the appropriate newlines and prefixes.
toDataString looks like this:
export function toDataString(data: string | Record<string, unknown>): string {
  if (isObject(data)) {
    return toDataString(JSON.stringify(data))
  }

  return data
    .split(/\r\n|\r|\n/)
    .map((line) => `data: ${line}\n\n`)
    .join('')
}Notice how we add the
data:prefix to each line with a double newline. This is important! Double newlines are how theEventSourceAPI knows when to emit an event on the client.
toDataString lets us send a string or an object.
If you're wondering what the message object looks like, it's just a simple interface with a generic:
export interface Message<T = string | Record<string, unknown>> {
  data: T
  comment?: string
  event?: string
  id?: string
  retry?: number
}
The combined code above should be enough to get your text stream looking good. You can organize this code to your liking.
This methodology applies to other backend languages like Go, Python, etc. Great article here.
Step 4: Create a SSE Stream 🤝
Remember how I talked about your runtime environment? Well, this is the secret sauce. Creating a Web API-compatible stream is different from creating a classic Node stream.
Web API Stream
Let's create a Web API-compatible stream. This stream is compatible with the Nextjs Request and Response APIs.
As long as you have TransformStream available to you (which is available in nodejs>=18 and Bun), you can create a stream like this:
// app/api/stream/route.ts
import { NextResponse } from 'next/server'

export async function GET() {
  const stream = new TransformStream()
  const writer = stream.writable.getWriter()
  const encoder = new TextEncoder()
  ... // write your SSE messages here
  return new NextResponse(stream.readable, {
  headers: {
    'Content-Type': 'text/event-stream',
    Connection: 'keep-alive',
    'Cache-Control': 'no-cache, no-transform',
  },
})
}
Breaking this down, you can see TransformStream gives us both a reader and a writer. We will use the writer to write our SSE messages and return the reader to the client.
Classic Node Stream
Here's how the same thing would look like with the classic Node Request/Response APIs, like Express:
// some-express-app.js
app.get('/streaming', (req, res) => {

    res.setHeader('Cache-Control', 'no-cache');
    res.setHeader('Content-Type', 'text/event-stream');
    res.setHeader('Access-Control-Allow-Origin', '*');
    res.setHeader('Connection', 'keep-alive');
    res.flushHeaders(); // flush the headers to establish SSE with client

    ... // write your SSE messages here
    res.write(message); // res.write() instead of res.send()

    // If client closes connection, stop sending events
    res.on('close', () => {
        console.log('client dropped me');
        res.end();
    });
});
By calling res.write, we are writing the SSE chunk to the stream (which defaults to utf8 encoding).
If you're using Nestjs, check out their SSE implementation for a more robust example.
Step 5: Write your SSE Messages 📨
Now that you have a stream, you can write your SSE messages.
Here is sample code with the WriteMessage function we just made:
// app/api/stream/route.ts
import { NextResponse } from 'next/server'

export async function GET() {
  const stream = new TransformStream()
  const writer = stream.writable.getWriter()
  const encoder = new TextEncoder()

  writeMessage(
    writer,
    encoder,
    {
      data: 'Hello, world!',
    }
  )

  return new NextResponse(stream.readable, {
  headers: {
    'Content-Type': 'text/event-stream',
    Connection: 'keep-alive',
    'Cache-Control': 'no-cache, no-transform',
  },
})
}
Step 6: Let's make the writer type safe ⭐
If you're like me, you probably think, "This is great, but I want to make this type-safe!".
Let's make the writer type-safe by creating a generic SSEWriter class. This class will essentially be a wrapper around the writeMessage function we made earlier.
Most importantly, it will ensure that the data property of the Message interface is correct by implementing an EventNotifier interface:
// app/api/stream/writer.ts
export class Writer implements EventNotifier {
  constructor(
    readonly writer: WritableStreamDefaultWriter,
    readonly encoder: TextEncoder
  ) {}

  writeMessage(){
    ...//same code as before
  }

  update(message: Message) {
    this.writeMessage(this.writer, this.encoder, message)
  }

  complete(message: Message) {
    this.writeMessage(this.writer, this.encoder, message)
    void this.writer.close()
  }
}

// 👇 a factory function to create the class above
export const getSSEWriter = (
  writer: WritableStreamDefaultWriter,
  encoder: TextEncoder
) => new Writer(writer, encoder)
Add a corresponding EventNotifier interface:
// app/api/stream/writer.ts
export interface Message<T = string | Record<string, unknown>> {
  data: T
  comment?: string
  event?: string
  id?: string
  retry?: number
}

export interface EventNotifier<
  T extends {
    update: T['update'] extends Message ? Message<T['update']>['data'] : never
    complete: T['complete'] extends Message
      ? Message<T['complete']>['data']
      : never
  } = any
> {
  update: (
    message: Message<T['update']>['data'],
  ) => void
  complete: (
    message: Message<T['complete']>['data'],
  ) => void
}
As you can see, we can now ensure the passed type is correct by supplying a type to the EventNotifier interface generic.
We have a little of that Typescript magic now ✨.
What might an example look like? Let's say we have a RickEvents type:
type RickEvents = EventNotifier<{
  update: {
    data: {
      neverGonna: string
      giveYouUp: string
    },
    event: 'some-event'
  }
  complete: {
    data: {
      neverGonna: string
      letYouDown: string
    },
    event: 'some-event'
  }
}>
We can now ensure that the update and complete methods only accept the correct data. These
methods write the valid SSE message to the stream.
Piecing it all together, we can now write type-safe SSE messages:
// app/api/stream/route.ts
import { NextResponse } from 'next/server'
import { getSSEWriter } from './writer'


export async function GET() {
  const stream = new TransformStream()
  const writer = stream.writable.getWriter()
  const encoder = new TextEncoder()

  const sseWriter = getSSEWriter(writer, encoder)

  const rickEventsStream = async (notifier: RicketEvents) => {
    notifier.update({
      data: {
        neverGonna: 'give you up',
        giveYouUp: 'never gonna',
      },
      event: 'some-event',
    })
    // 👈 do some async stuff here
    notifier.complete({
      data: {
        neverGonna: 'let you down',
        letYouDown: 'never gonna',
      },
      event: 'some-event',
    })
  }

  rickEventsStream(sseWriter)

  return new NextResponse(stream.readable, {
  headers: {
    'Content-Type': 'text/event-stream',
    Connection: 'keep-alive',
    'Cache-Control': 'no-cache, no-transform',
  },
})
}
And this is exactly what ts-sse does! Understanding these concepts allows for a more flexible and robust SSE implementation.
We can even pass a zod schema (if you fancy zod) to the EventNotifier interface:
// app/api/stream/route.ts
type RickEvents = EventNotifier<{
  update: {
    data: z.infer<typeof rickRollSchema>
    event: 'some-event'
  }
  ...
}>
Step 7: Use SSE on the client with EventSource 📡
Now that we have a stream, we can use the EventSource API to listen to the stream.
This example uses React, but you can use any framework or even vanilla JS (if you're bold enough).
'use client'
import { useEffect, useState } from "react"
import { z } from "zod"
import { rickAstleySchema } from "./stream/types"

export const StreamClient = () => {
  const [lyric, setLyric] = useState<string>("")
  const source = new EventSource("/api/stream") // 👈 the route we made earlier
                 // 👆 EventSource supports relative paths
  // 👇 listen to the event
  useEffect(() => {
    source.addEventListener('some-event', (event) => {
      const parsed = rickAstleySchema.safeParse(event.data)
      if (parsed.success) {
        setLyric(parsed.data)
      }
    })
  }, [])
  return lyric
}
Because we're importing the rickAstleySchema from the server code, we get the same type safety on the client!
Note: if you're using Nextjs and wish to share types, make sure they are in a separate file or imported via
import type { myType }.
There are plenty of more EventSource examples on the web. Let me know if you'd like me to write an EventSource article!
That's it, folks!
I hope this article helped you learn a thing or two. If you have any questions, feel free to reach out to me on Twitter or GitHub.
I'll be updating this page occasionally. You can also find the source code for ts-sse here.